Developer Guide
Table of Contents
- Acknowledgements
- Setting up, getting started
- Design
- Implementation
- Documentation, logging, testing, configuration, dev-ops
- Appendix: Requirements
- Appendix: Instructions for manual testing
Acknowledgements
- This product is adapted from AddressBook Level-3
- Libraries used: JCommander, JavaFX, JUnit5
- APIs used: NUSMods
Setting up, getting started
Refer to the guide here.
Design
Architecture

The Architecture Diagram given above explains the high-level design of the App.
Given below is a quick overview of main components and how they interact with each other.
Main components of the architecture
Main has two classes called Main
and MainApp. It is responsible for,
- At app launch: Initializes the components in the correct sequence, and connects them up with each other.
- At shut down: Shuts down the components and invokes cleanup methods where necessary.
Commons represents a collection of classes used by multiple other components.
The rest of the App consists of four components.
-
UI: The UI of the App. -
Logic: The command executor. -
Model: Holds the data of the App in memory. -
Storage: Reads data from, and writes data to, the hard disk.
How the architecture components interact with each other
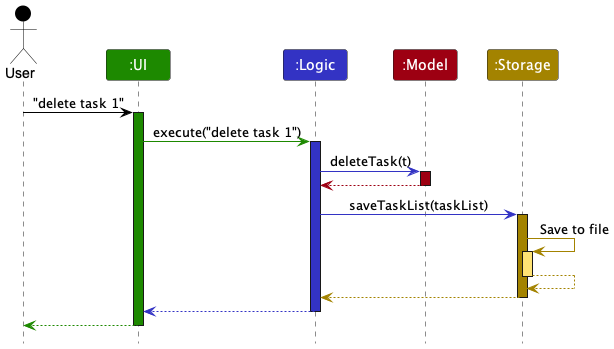
The Sequence Diagram below shows how the components interact with each other for the scenario where the user issues the command delete task 1 to remove the task with index 1.
Note that while our program has both tasks and modules, the flow of logic for doing operations (i.e. delete, add etc.) on them are similar. Therefore, although the following sections only illustrate the components in the context of modules, they are similar when applied in the context of tasks as well.
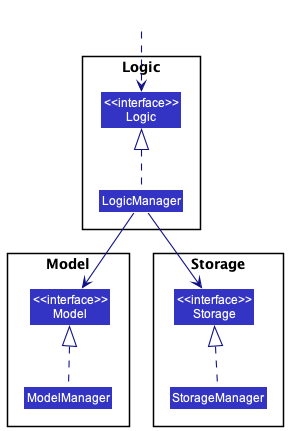
Each of the four main components (also shown in the diagram above),
- defines its API in an
interfacewith the same name as the Component. - implements its functionality using a concrete
{Component Name}Managerclass (which follows the corresponding APIinterfacementioned in the previous point.
For example, the Logic component defines its API in the Logic.java interface and implements its functionality using the LogicManager.java class which follows the Logic interface. Other components interact with a given component through its interface rather than the concrete class (reason: to prevent outside component’s being coupled to the implementation of a component), as illustrated in the (partial) class diagram below.
The sections below give more details of each component. As stated above, tasks are omitted in place of modules in the following sections due to the similarity between them.
UI component
API : Ui.java
Section by : Marciano
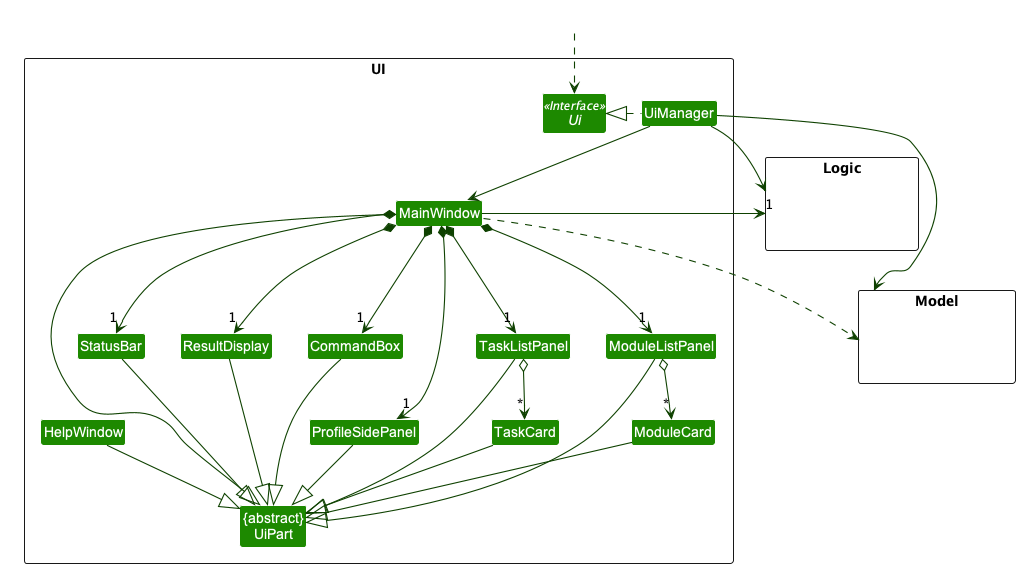
The UI consists of a MainWindow that is made up of parts e.g.CommandBox, ResultDisplay, ModuleListPanel, StatusBarFooter etc.
All these, including the MainWindow, inherit from the abstract UiPart class which captures the commonalities between
classes that represent parts of the visible GUI.
The UI component uses the JavaFx UI framework.
The layout of these UI parts are defined in matching .fxml files that are in the src/main/resources/view folder.
For example, the layout of the MainWindow
is specified in MainWindow.fxml
The UI component,
- Executes user commands using the
Logiccomponent. - Listens for changes to
Modeldata so that the UI can be updated with the modified data. - Keeps a reference to the
Logiccomponent, because theUIrelies on theLogicto execute commands. - Depends on some classes in the
Modelcomponent, as it displaysModuleobject residing in theModel.
MainWindow
The MainWindow class is the hub for all UI components which are listed below:
-
CommandBox- Command box to get user input. -
ResultDisplay- Displays the message returned by the command entered. (Soon to contain avatar image) -
ModuleListPanel- Panel displaying the modules input to the system. -
TaskListPanel- Panel displaying the task input to the system (According to the respective module). -
ProfileSidePanel- Panel displaying the user’s profile and fundamental details.
The MainWindow coordinates the backend of the system to the frontend of the system to make visible changes to the interface.
This is done through the executeCommand(String commandText) method. Upon user input, the logic class executes the
respective command and the model is updated to reflect the changes.
Subsequently, after the model has been updated, the following UI classes ResultDisplay is refreshed as a result.
CommandBox
The CommandBox class contains an editable JavaFX Component TextArea, which allows user to input user commands.
ResultDisplay
The ResultDisplay class shows the message returned from the user’s input.
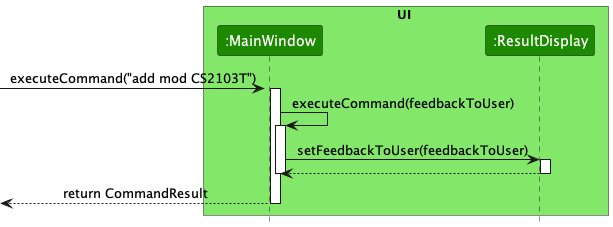
- Command is executed on
MainWindow. -
MainWindowcalls the methodexecuteCommand, which refreshes the resultant message displayed inResultDisplay. -
ResultDisplayupdates its JavaFXTextAreaaccording to theCommandResultof the command given. In this case, theTextAreawill display the message returned as a result of the command. - ResultDisplay displays visible change on the interface.
-
executeCommandends execution.
ModuleListPanel
The ModuleListPanel class contains a ListView<Module> JavaFX component displaying a list view of the component inside.
In this case, the list inside is a list of ModuleCard objects.
The contents of the list are dependent on the modules of the user. Each module input by the user will be displayed
as a ModuleCard object, presented in the form of ListView.
TaskListPanel
The TaskListPanel class contains ListView<Task> JavaFX component displaying a list view of the component inside.
In this case, the list inside is a list of TaskCard objects.
The contents of the list are dependent on the tasks of the user. Each module input by the user will be displayed
as a TaskCard object, presented in the form of ListView.
ProfileSidePanel
The ProfileSidePanel class contains the user’s profile. The following information is displayed in on the object:
- Course name
- Inspiring quote
- Modular Credits completed by user
- Number of Active Tasks
Here is how the ProfileSidePanel works:
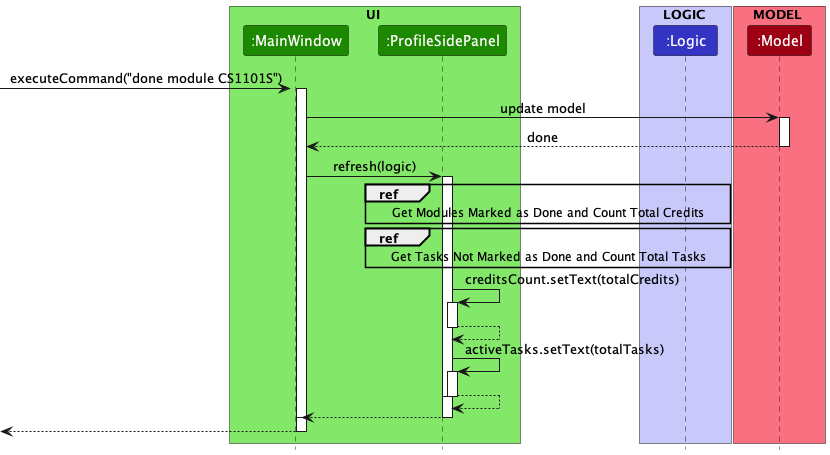
- Command executed on
MainWindow. -
Modelis updated. -
MainWindowcalls the methodrefresh, which refreshes theProfileSidePanel. -
ProfileSidePanelusesLogicto obtain the corresponding information:- MCs completed
- Active tasks
-
ProfileSidePanelexecutes corresponding JavaFX methods to update displayed information. -
ProfileSidePanelshows visible change on the interface. -
refreshends execution.
Other Components
In addition to the main UI components in the MainWindow class, these are other UI Components:
-
ModuleCard- Individual card containing the relevant information of the module. List of ModuleCard contained in the ModuleListPanel. -
TaskCard- Individual card containing the relevant information of the task. List of TaskCards contained in the TaskListPanel. -
HelpWindow- Pop-up window containing the link the User Guide, as well as a (proposed) list of all the commands in the application.
Logic component
API : Logic.java
Here’s a (partial) class diagram of the Logic component:
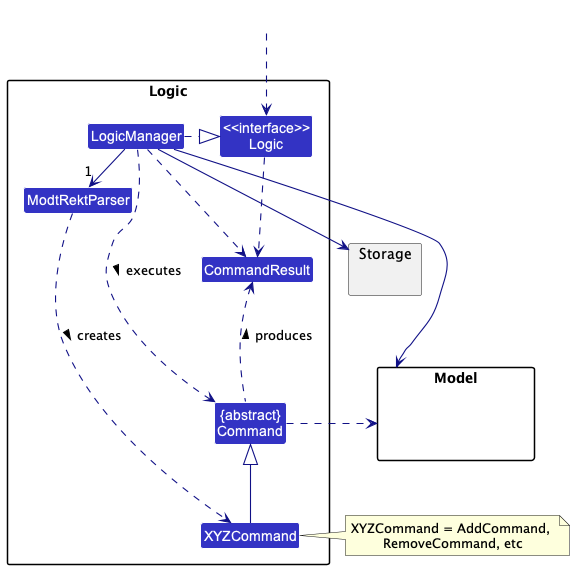
How the Logic component works:
- When
Logicis called upon to execute a command, it uses theModtrektParserclass to parse the user command. - This results in a
Commandobject (more precisely, an object of one of its subclasses e.g.,AddCommand) which is executed by theLogicManager. - The command can communicate with the
Modelwhen it is executed (e.g. to add or remove a module). - The result of the command execution is encapsulated as a
CommandResultobject which is returned fromLogic.
The sequence diagrams in the sections below will illustrate the interactions within the Logic component.
How the parsing works:
- When called upon to parse a user command, the
ModtrektParserclass creates anXYZCommand(XYZis a placeholder for the specific command name e.g.,AddCommand) which is returned toModtrektParseras aCommandobject.
Model component
API : Model.java
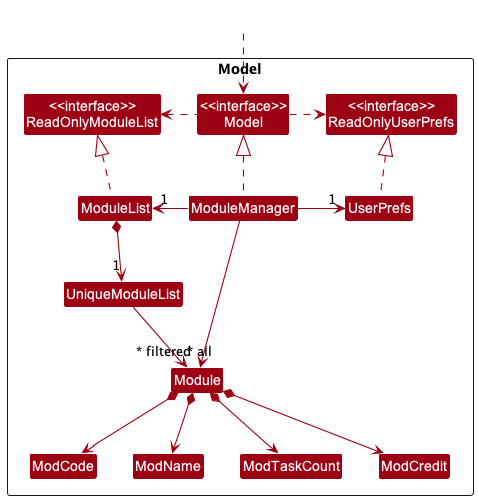
The Model component,
- stores the address book data i.e., all
Moduleobjects (which are contained in aUniqueModuleListobject). - stores the currently ‘selected’
Moduleobjects (e.g., results of a search query) as a separate filtered list which is exposed to outsiders as an unmodifiableObservableList<Module>that can be ‘observed’ e.g. the UI can be bound to this list so that the UI automatically updates when the data in the list change. - stores a
UserPrefobject that represents the user’s preferences. This is exposed to the outside as aReadOnlyUserPrefobjects. - does not depend on any of the other three components (as the
Modelrepresents data entities of the domain, they should make sense on their own without depending on other components)
Storage component
API : Storage.java
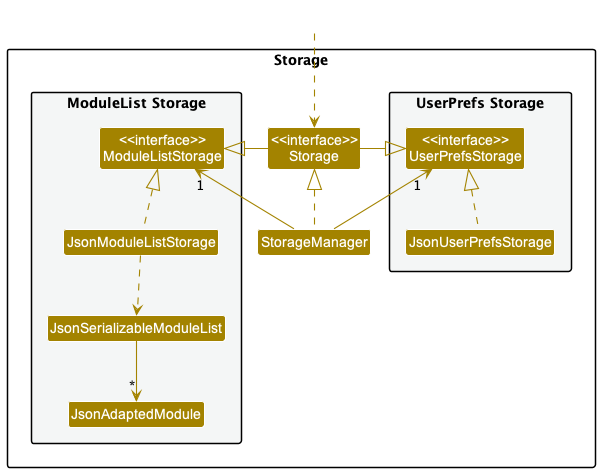
The Storage component,
- can save both address book data and user preference data in json format, and read them back into corresponding objects.
- inherits from both
ModuleListStorageandUserPrefStorage, which means it can be treated as either one (if only the functionality of only one is needed). - depends on some classes in the
Modelcomponent (because theStoragecomponent’s job is to save/retrieve objects that belong to theModel)
Common classes
Classes used by multiple components are in the modtrekt.commons package.
Implementation
This section describes some noteworthy details on how certain features are implemented.
Module Features
Section by : Ho Jun Hao
Add module
In this section, the functionality of add module feature, expected execution path, and the interactions between
AddCommand, ModtrektParser, and other objects will be discussed.
What is the add module feature
The add module features allows users to add a module that they have taken or are currently taking into the
ModuleList.
In order to add tasks or deadlines related to the module, a module would have to be created.
Information regarding module, for verbose inputs, can be recognised in the CLI using these tags:
-n <module_name>-cr <module_credit>
Design considerations
Aspect 1: How many modules are added:
-
Alternative 1 (current choice): Add 1 module added per AddModuleCommand.
- Pros: Easy to implement.
- Cons: May have to type more to add multiple modules.
-
Alternative 2: Add multiple modules per AddModuleCommand.
- Pros: Convenient for user.
- Cons: More complicated, may require much more parsing.
We decided to go with the alternative 1 to keep the logic simple and easier to work with. To tackle the cons we tried to
reduce the compulsory AddModuleCommand parameters and created simplified commands such as add mod.
Aspect 2: What parameters do we need:
-
Alternative 1: Manually add all the required parameters.
- Pros: Able to add modules that are not on NUSMods.
- Cons: Troublesome to add multiple parameters.
-
Alternative 2: Only require module code and fetch the relevant information from NUSMods API.
- Pros: Convenient for user as the only module code is required for the parameter.
- Cons: If the NUSMods API server is down, users would not be able to add their modules.
We decided to go implement both alternatives as we wanted to give users greater flexibility.
Current implementation
The diagram below showcases the path execution for when adding a module
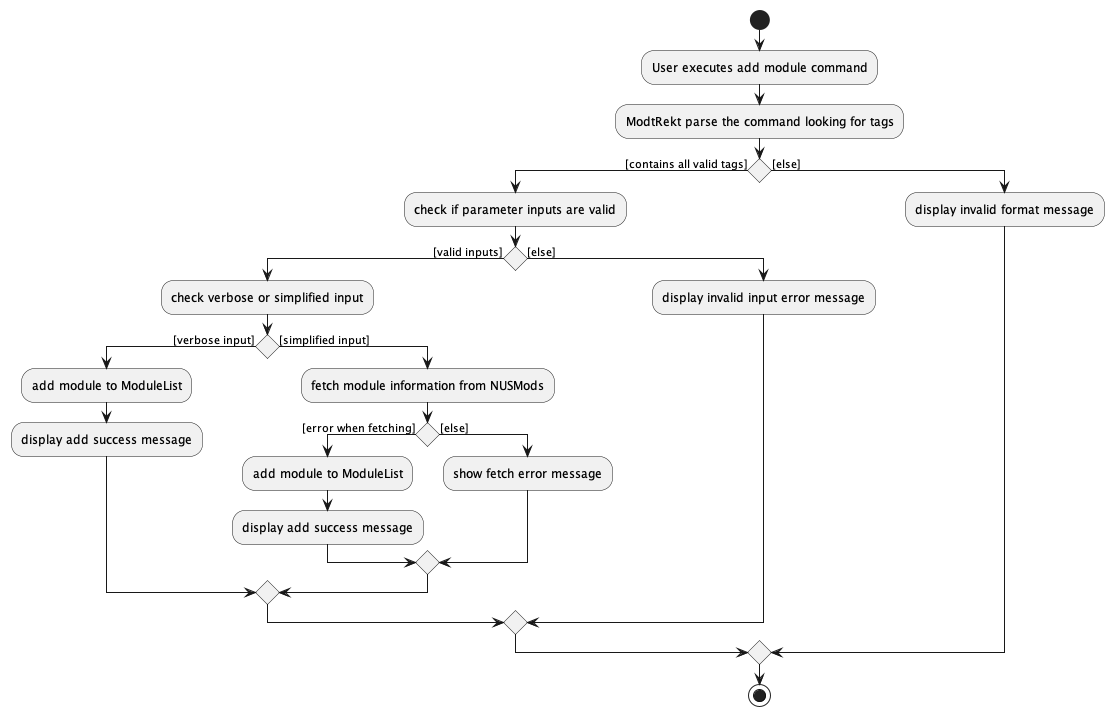
The diagram below shows how the add command work with input add mod CS2103T
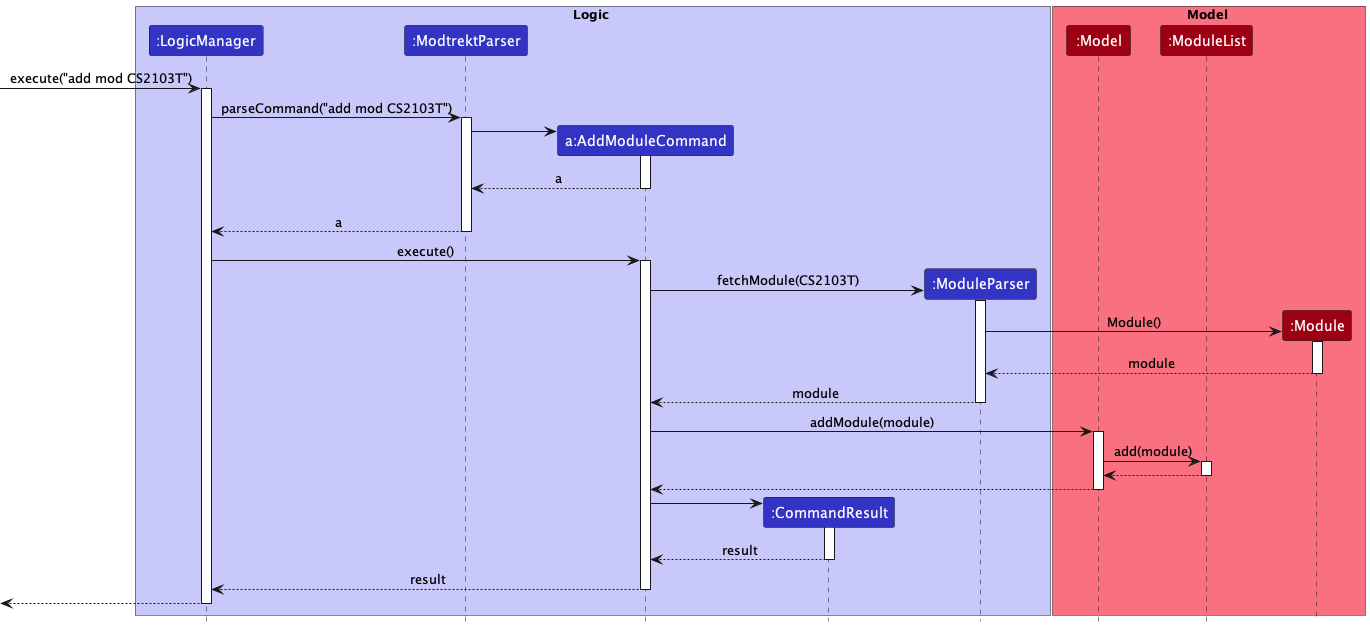
The arguments are first parsed through ModtrektParser to identify the command word and its various parameters.
The process is being simplified using the JCommander library which automatically parses the command and returns the
appropriate command, in this case AddModuleCommand. During execution, module details would be fetched from NUSMods and
a Module would be fetched. The module then be added to the ModuleList through Model.
In the event that the HTTP request made to NUSMods fails when fetching, a fallback data file is present to provide the
module data. The fallback data file is a JSON file that contains the module data of all the modules in NUS as of AY22/23.
The fallback data file is located in src/main/modrekt/logic/parser/modules/data/modules.json.
Additionally, the endpoint used to fetch from NUSMods is currently set to only fetch the modules in the academic year of 2022-2033 (AY22/23). This is an intended effect, as a collaboration with NUS is something we hope to seek in the future to provide a more robust module data fetching system. As such, if utilised in years beyond AY22/23, the module data obtained may be out of date. To further mitigate this, we also have our verbose module adding command, where users can specify the module name, code and credits, without any reliance on NUSMods.
Remove Module
In this section, the functionality of remove module feature, expected execution path, and the interactions between the
RemoveModuleCommand, ModtrektParser, and other objects will be discussed.
What is the remove module feature
The remove module features allows users to remove a module that they have taken or mistakenly inputted into
ModuleList.
Removal of a Module would remove all Task and Deadline associated with it.
Design considerations
Aspect: How are modules removed:
-
Alternative 1 (current choice): Using their index in the list.
- Pros: Easier for user to select.
- Cons: May be hard to find module especially if module list is long. More complicated as index may change especially after modifying the module list
-
Alternative 2: Using the module code.
- Pros: User need not list the modules to find exact module to remove.
- Cons: User needs to type more.
We decided to go with the alternative 1 as it would be faster for users to type inputs. Furthermore, at any point, it is unlikely that users will take so many modules such that the GUI is unable to display all the modules. We also have a feature that would remove previously taken modules so that it would not clutter up the GUI.
Current implementation
The diagram below showcases the path execution for when removing a module
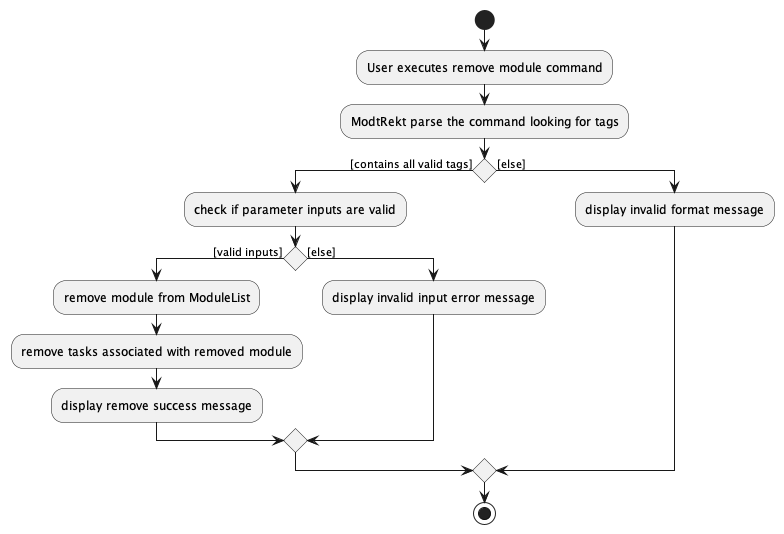
The diagram below shows how the remove command work with input remove module CS2103T
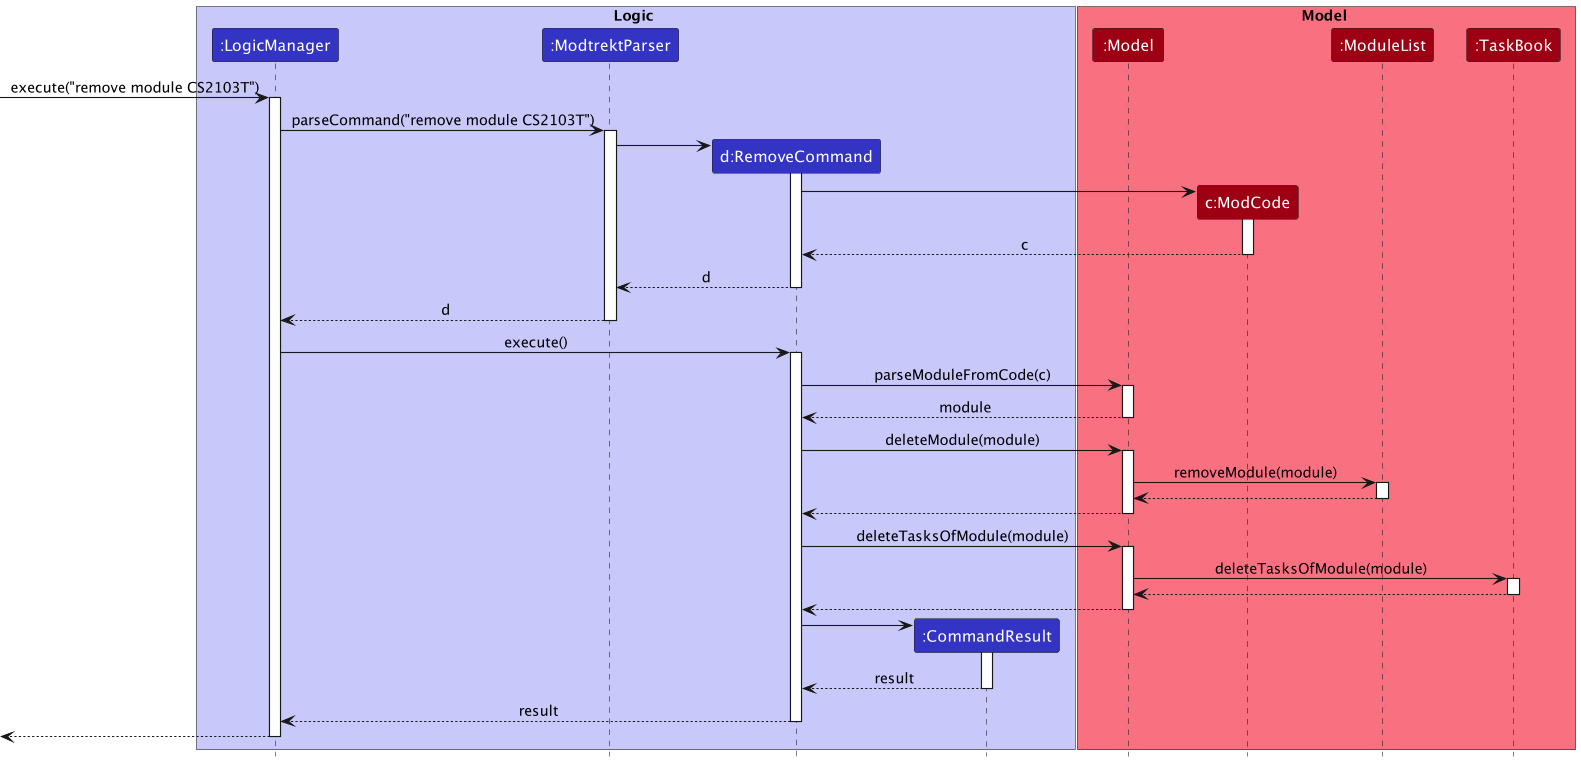
The arguments are first parsed through ModtrektParser to identify the command word. The JCommander library would
help us parse the command and return the appropriate command. In this case it is RemoveModuleCommand.When the
RemoveModuleCommand is executed, it would first remove the Module from the ModuleList. Then it would remove all
Task in the TaskBook with the Module.
Navigation
Section by : David
Change Current Module
The cd command allows users to set a module as the current module, which accomplishes two things:
- Firstly, it filters the current task list in the UI to only show tasks from the corresponding module
- Additionally, all further commands are parsed in the context of the corresponding module. For instance, commands that require a task index, such as
remove task 1, will now base the index on the updated filtered task list.
The relevant commands are:
-
cd <module code>sets the current module to the module with the specified module code -
cd ..sets the current module tonull, if it is not alreadynull
Design Considerations
The syntax and command word were aspects that we took into consideration in the design process.
-
Using the shorthand word
cdand similar syntax e.g.cd ..(Current Implementation)- Pro: Users who are familiar with CLI applications will be able to use similar syntax for navigation inside the application
- Pro: Users will be able to navigate through the application faster, due to the shorter command word and syntax
- Con: Users who are not familiar with CLI applications would have to remember a specific command word that may not be very intuitive
-
Using a longer command word e.g.
enterandexit- Pro: The command word is more universally intuitive, especially for users who are not familiar with CLI applications
- Con: Users who are already familiar with CLI applications will have to relearn navigation using a different command
- Con: Users will have to type out a longer command word and syntax, which will reduce the speed at which a user can navigate through the application
Taking into account that our target user profile is one that is familiar with using CLI apps, we chose option 1 as it provided the most benefit for such a user. In particular, it contributes to the goal of allowing the user to accomplish tasks (in this case navigation) in a shorter time using the CLI.
Current implementation
The current module is a ModCode stored as a variable in ModelManager. Its value is used as part of a custom predicate that is used to call Model::updateFilteredTaskList, in order to filter the tasks to only display those belonging to the corresponding module.
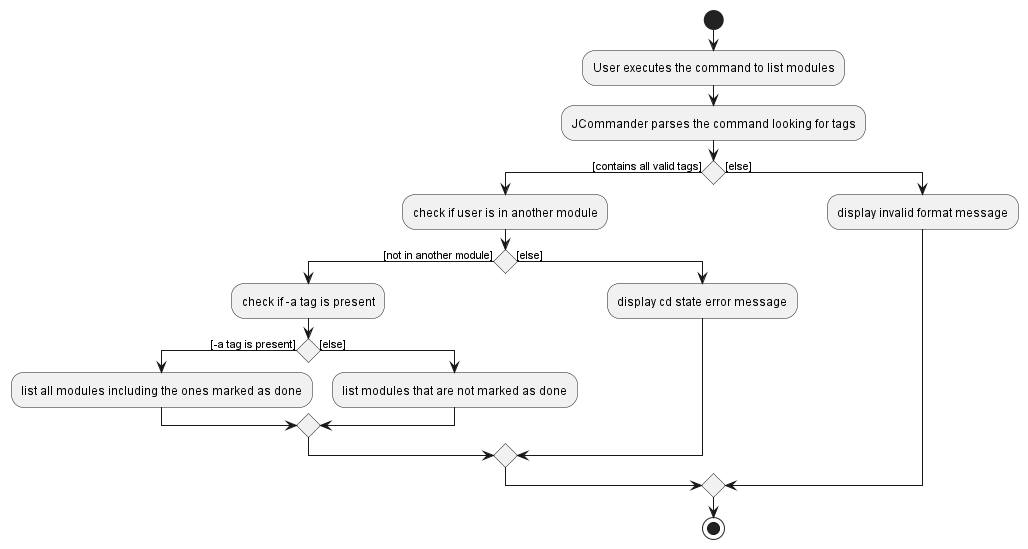
The following activity diagram shows the execution and control flow for the cd command.
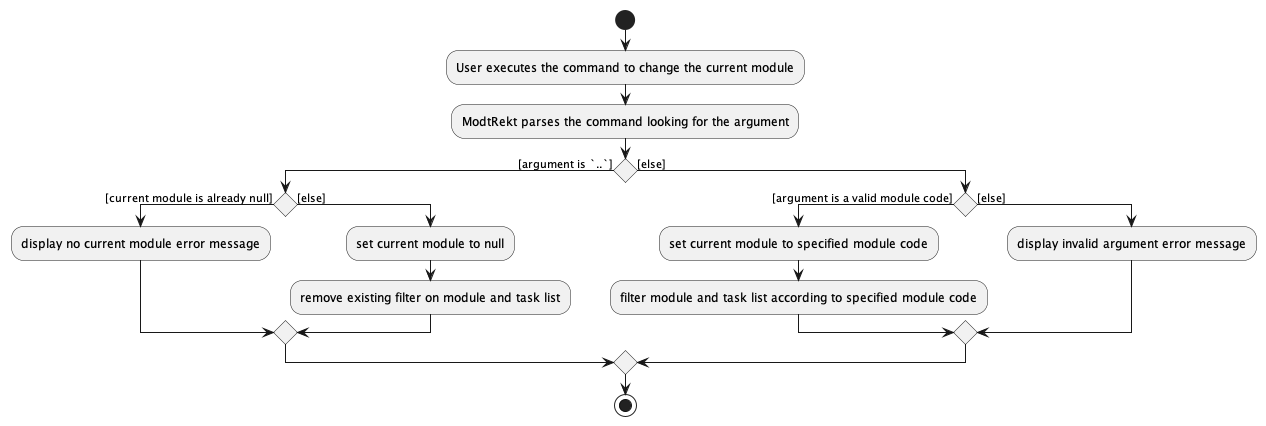
As seen from the diagram, when the user enters the command cd .. to exit from the currently selected module, a check is performed to determine whether there is a current module.
In the case where there is no current module, i.e. the user is already at the ‘root’ (and all modules/tasks are listed), an error message is shown to the user alerting them of this fact. This improves the user experience as it prevents the case of a user repeatedly entering the cd .. command and wondering why the display never changes.
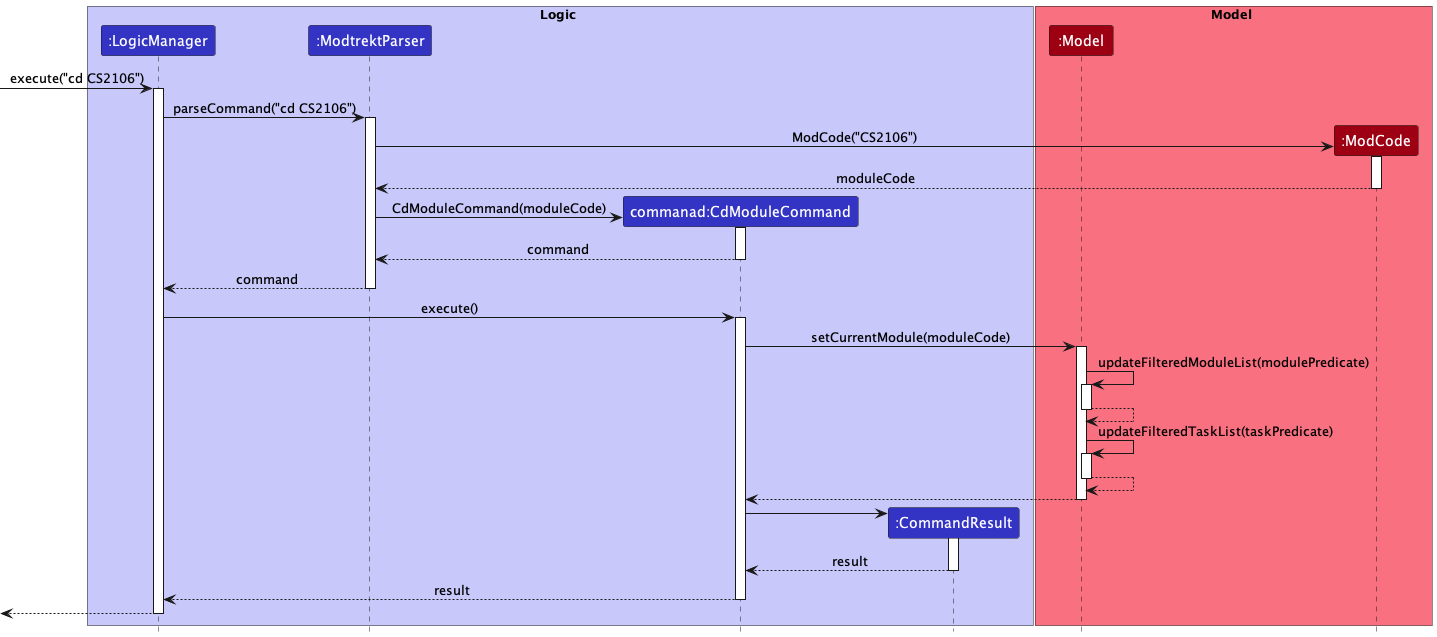
The sequence diagram below shows the flow of the interactions between the different components upon execution of the command cd CS2106.
In the diagram, the predicates modulePredicate and taskPredicate are the custom predicates used to filter the module and task lists, respectively. They are within the setCurrentModule method in Model.
Marking modules as done
Section by : Marciano
Allows users to mark their modules as done, and alternate between viewing all modules and viewing undone modules via the list command.
Every module in the module list will be in either the done or undone state.
New tag will be created to mark a module as done.
In this section, we will discuss the management of done/undone state, as well as the interactions between the commands and the UI.
The relevant commands for this section are:
-
done module <module code>marks the module with a done tag in the UI -
undone module <module code>removes the done tag from a module (if present) in the UI
Design considerations
There was an alternative we considered for users to select the module to mark as done:
-
Alternative 1: Using the module name:
- Pro: Users do not have to search for a module code.
- Con: Users have to type a significant amount to disambiguate modules by their name.
-
Alternative 2: Using the module index:
- Pro: Users can mark modules as done without much typing.
- Con: Module index is not visible in UI. It is quite tedious to count the index manually if user has a lot of modules.
-
Alternative 3: Using the module code (current implementation):
- Pro: Users can mark modules as done by their module code easily without much typing.
- Con: Users still have to type more than if they were to specify via index.
To optimize the amount of typing a user has to do, we decided to choose the second option.
Current implementation
The done/undone state is handled in the Module class via a boolean flag isDone.
Because Module is immutable, the methods Module::done and Module::undone return a new Module
with the done/undone state changed instead of mutating the isDone variable directly.
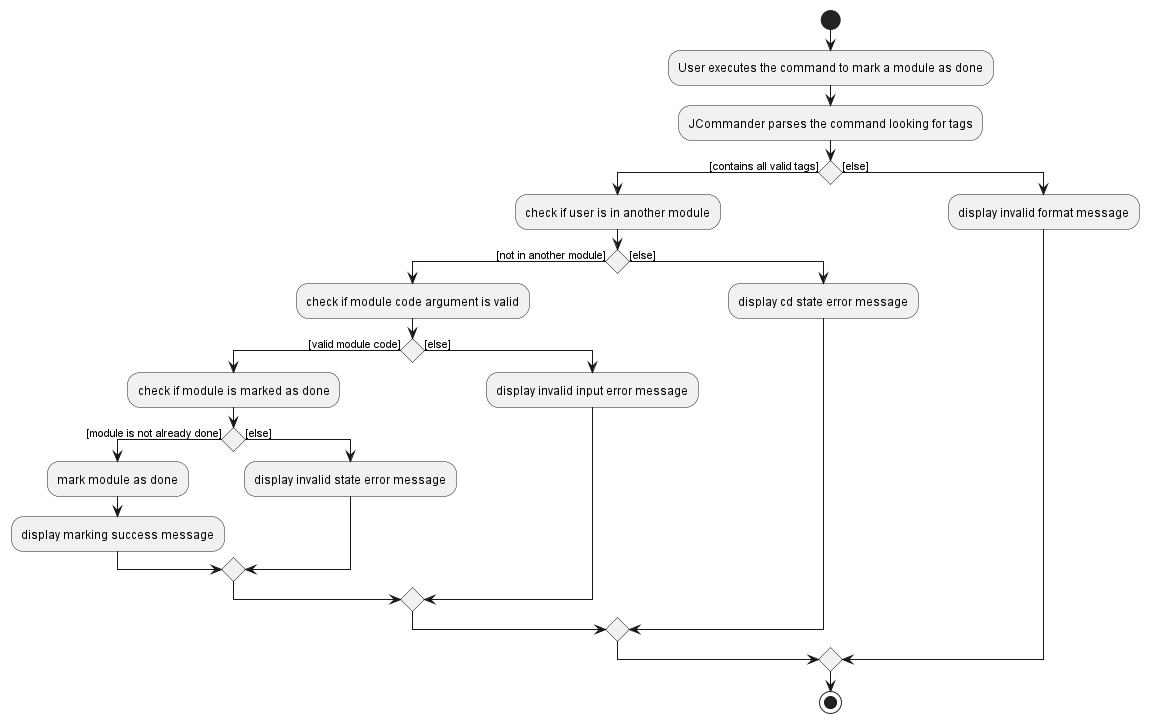
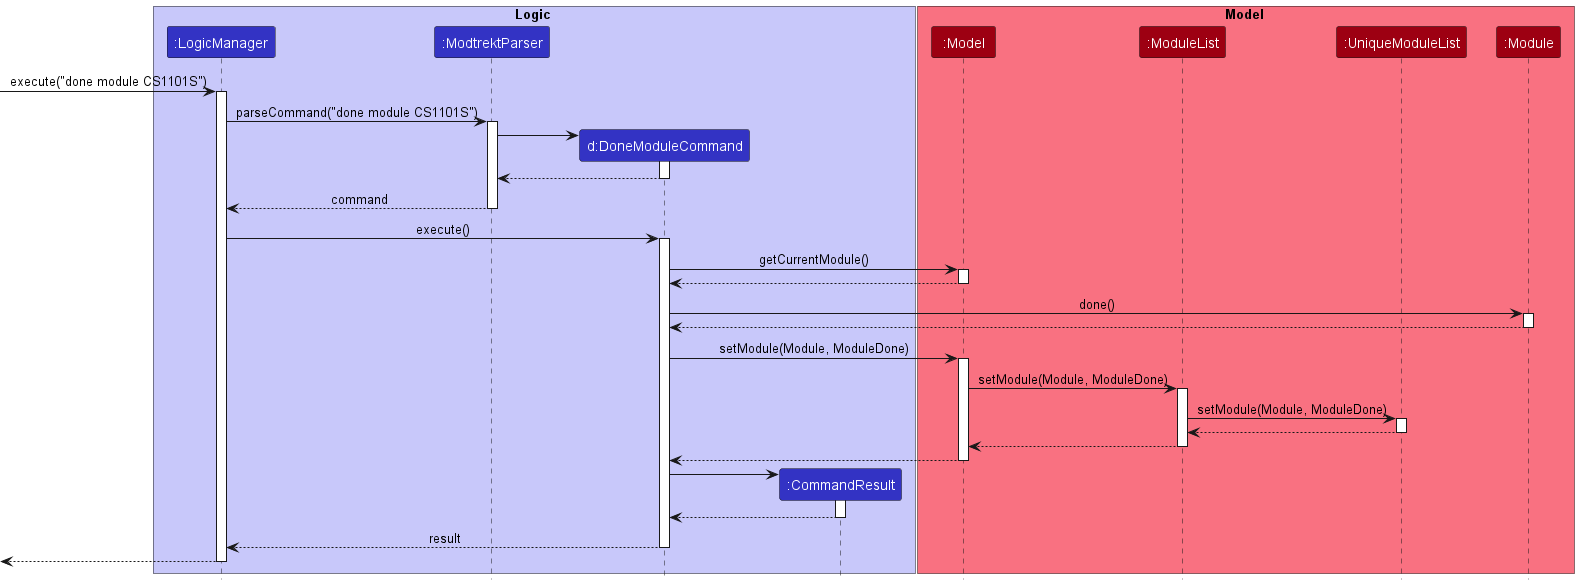
The following diagram shows the execution and control flow of the done command.
The diagram below shows how the done command work with input done module CS1101S
Notice how we explicitly prevent a done module from being marked as done again. Even though marking a done module as
done again is inconsequential from a data perspective (nothing in a Module changes other than the creation of a new
instance), it is still a user error that should be handled:
Suppose that a user intended to mark a module as undone, but accidentally entered the
donecommand instead. By displaying an error instead of silently accepting the erroneous command, the user is notified and can enter the correct command next—this results in better UX!
The classes directly involved in setting the done/undone state from user input are:
-
DoneModuleCommandandUndoneModuleCommandwhich are the commands that when executed, mark tasks as done or undone respectively. -
ModtrektParserwhich parses the command word and delegates the parsing to JCommander. -
LogicManagerwhich executes the commands.
For brevity, we omit the diagrams and explanations for marking modules as undone—it is the direct inverse of marking tasks as done, such that the control flow is exactly the same: just replace “done” and its derivatives with “undone”, and vice versa.
Module listing
Section by : Marciano
Module listing allows users to view the modules they have added.
The relevant commands for this section are:
-
cdsets path to the homepage. (Not inside of any module) -
ls mod/ls moduledisplays only the undone modules (active modules) in the UI. -
ls mod -a/ls module -adisplays all the modules, including the ones marked done, in the UI.
Current implementation
We check for the presence of the -a flag to decide whether to display done tasks.
The following diagram shows the execution and control flow of the list module command.
The sequence diagram below details the interactions between the command and the model
for the ls mod and ls mod -a commands:
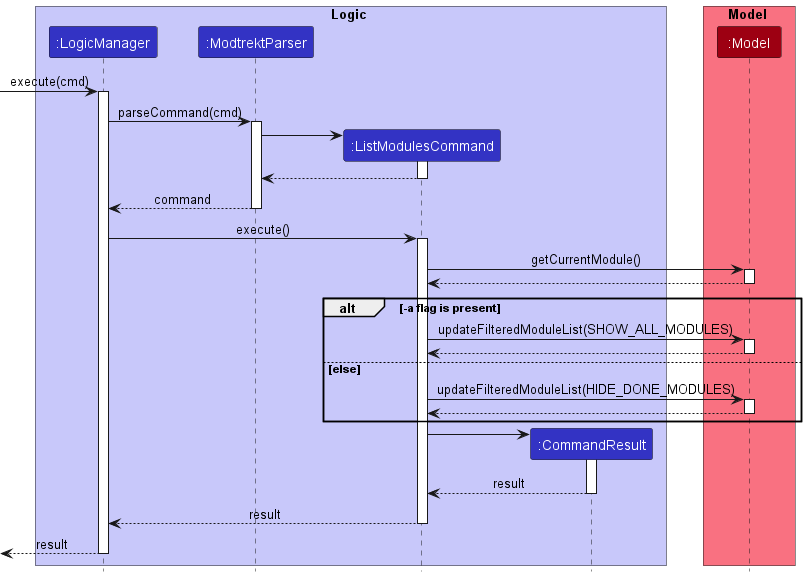
The predicates defined by Model.PREDICATE_SHOW_ALL_MODULES and PREDICATE_HIDE_DONE_MODULES are used to filter
the tasks displayed in the UI via the updateFilteredModuleList method in the Model interface.
Side note: We delegate parsing to JCommander which already has the command object registered
Edit Module
Section by : Ho Jun Hao
In this section, the functionality of edit module feature, expected execution path, and the interactions between the
EditModuleCommand, ModtrektParser, and other objects will be discussed.
What is the edit module feature
The edit module features allows users to edit a module that they have erroneously added.
This allows them to update details of the module, such as the module name, module credit and module code.
Editing a module code would edit all the tasks currently associated to the module to the new module code.
Design considerations
Aspect 1: Whether editing modules should be allowed:
-
Alternative 1 (current choice): Allow editing of modules.
- Pros: Allows users to change partial details in the event of a small error.
- Cons: Have to parse a varying amount of optional arguments.
-
Alternative 2: No edit command, user would have to delete and re-add their module.
- Pros: Convenient for development, less bug-prone.
- Cons: Inconvenient and troublesome for the user.
We decided to go with the alternative 1 to give our users the best experience possible. We concluded that editing a module would be faster than deleting a module and re-entering all the details, particularly if the user is using the verbose command inputs.
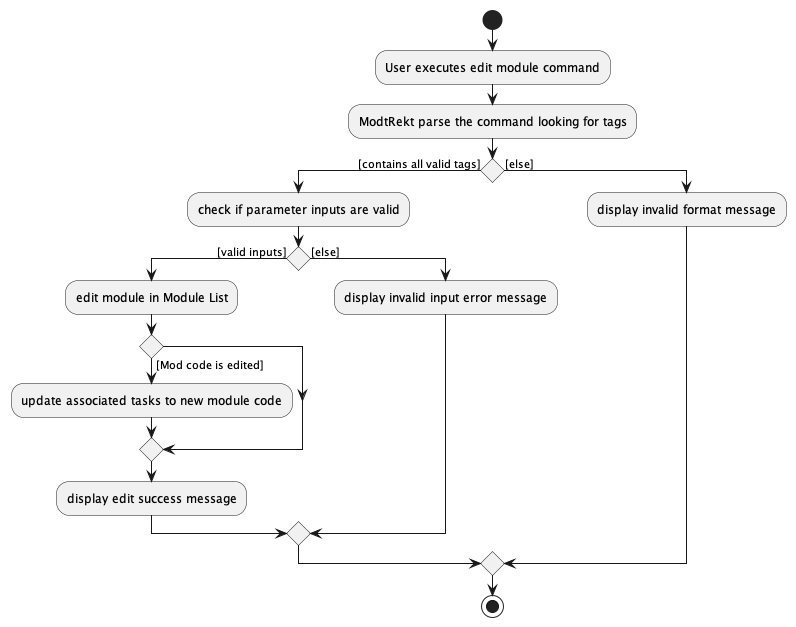
Current implementation
The diagram below showcases the path execution when editing a module
The diagram below shows how the remove command work with input edit module CS2103T -c CS2100
Note that the sequence diagram has been kept simple, as the logic flow for addModule and deleteModule have been
covered in greater detail in the earlier diagrams.
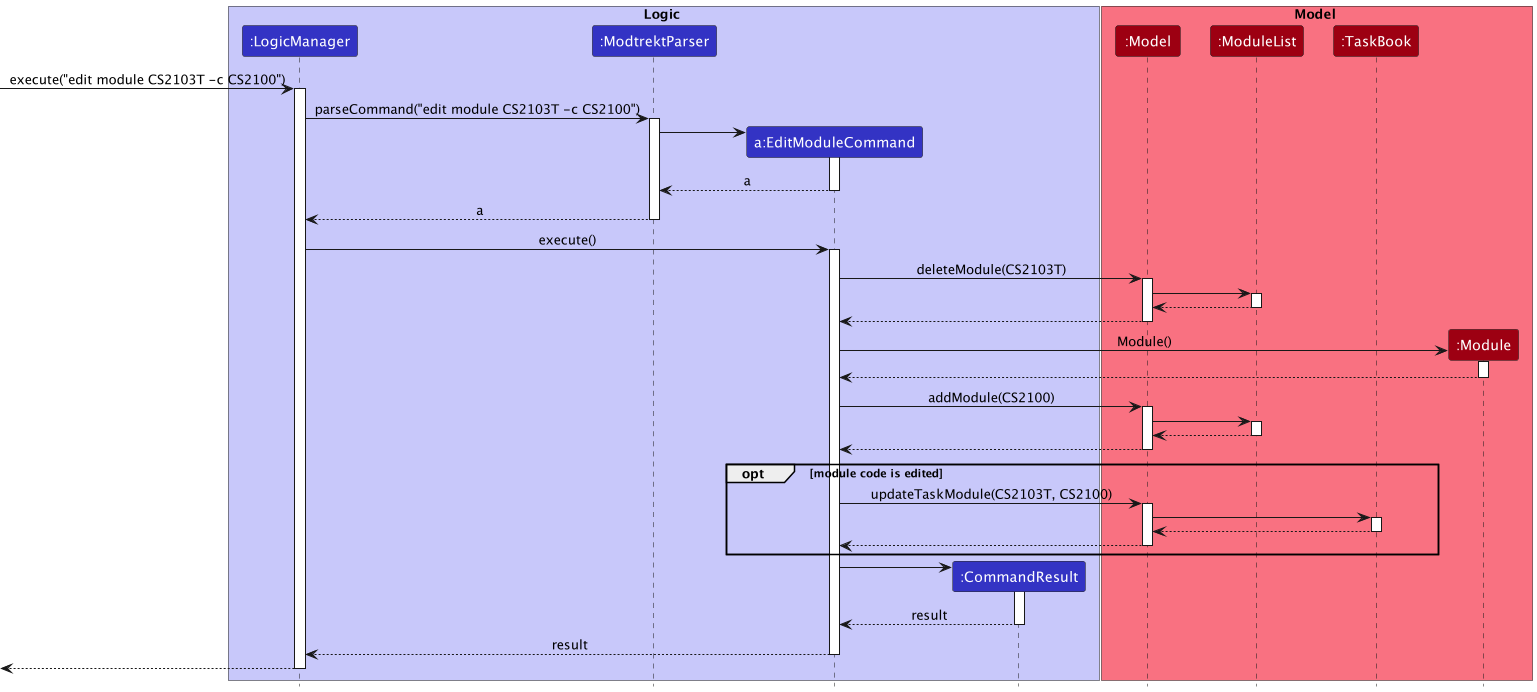
The arguments are first parsed through ModtrektParser to identify the command word. Using the JCommander library, we
are then able to parse through the commands and automatically generate the corresponding command. In this case an
EditModuleCommand. When the EditTaskCommand is executed, it would first obtain the Module using the Module Code.
Then it would create a new module replacing with the appropriate new/old inputs. It would then delete the old module and
replace it with the new module. If module code is edited, it would replace all the old tasks with old module code with
new tasks with new module code.
Tasks
Task/Deadline Features
Section by : Dominic
Add task
In this section, the functionality of add task feature, expected execution path, and the interactions between
AddTaskCommand, AddDeadlineCommand, AddTaskCommand, ModtRektParser and other objects will be discussed.
Deadlines are an extension of tasks, and have a due date. For the most part, their implementations are
similar, and areas where they differ will be highlighted. As such, please consider deadline to be synonymous
with task, unless explicitly stated.
What is the add task feature
The add task features allows users to add a task or a deadline that they have taken or are currently taking into the
TaskList.
In order to add tasks or deadlines related to the module, a module would have to be created.
Additionally, the modules to which these tasks belong need to be specified within
the command. If the user is cd‘d into the module, the module code will not
be required in the command.
Information regarding tasks/deadlines can be recognised in the CLI using tags.
These tags are:
<task name/description>-
-d <YYYY-MM-DD>(this is only required for adding deadlines) -c <module_code>
Note that the task task name/description tag was specified to be the main
parameter, a feature that JCommander allows for,
and as such, a tag is not required for it. Do note that it is a mandatory argument.
Design considerations
Aspect 1: How many tasks are added:
-
Alternative 1 (current choice): Add 1 task added per AddTaskCommand.
- Pros: Easy to implement.
- Cons: May have to type more to add multiple tasks.
-
Alternative 2: Add multiple tasks per AddTaskCommand.
- Pros: Convenient for user.
- Cons: More complicated, may require much more parsing.
We decided to go with the alternative 1 to keep the logic simple and easier to work with. To tackle the cons we tried to reduce the compulsory AddTaskCommand parameters.
Aspect 2: What parameters do we need:
-
Alternative 1: Add task by specifying module index instead of code.
- Pros: Less verbosity in the command, user can go off of the displayed index.
- Cons: Slightly more complicated as more errors need to be handled (invalid index etc.). Users may also be more prone to adding the task to the wrong module.
-
Alternative 2 (current choice): Require the user to specify the module code.
- Pros: Reduces the chance of error by the user, users will not need to remember the module index.
- Cons: User has to type more information in the command.
We decided to implement alternative 2 in order to reduce the chance of user error and reduce the potential for bugs.
Current implementation
The diagram below showcases the path execution for adding a task, when a user is NOT cd‘d
into a module. For ease of understanding, we will be adding a task instead of a deadline. Note that
the flow is exactly the same for both tasks and deadlines.
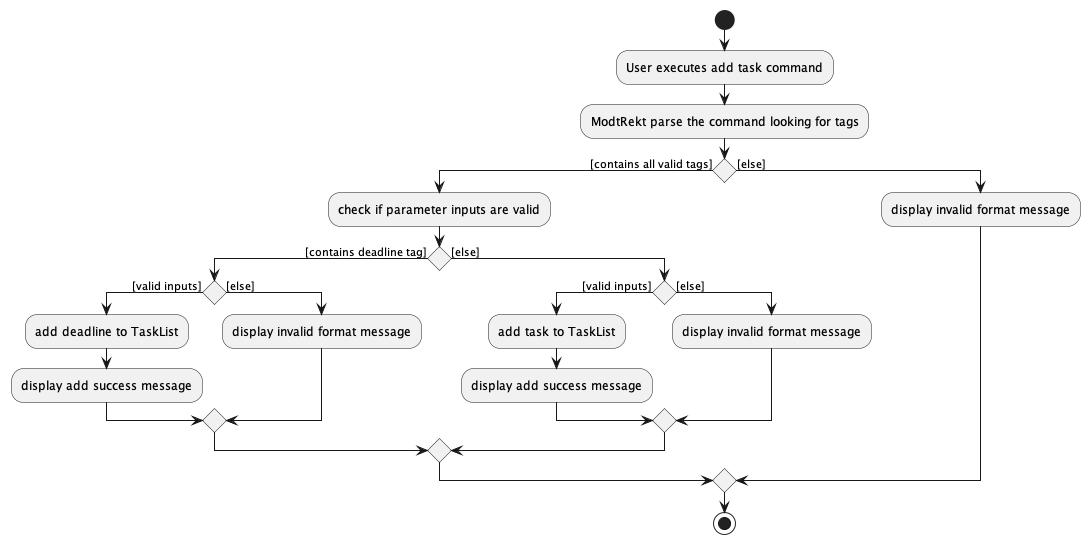
The diagram below shows how the add command work with input add task "Assignment 1" -c CS2103T
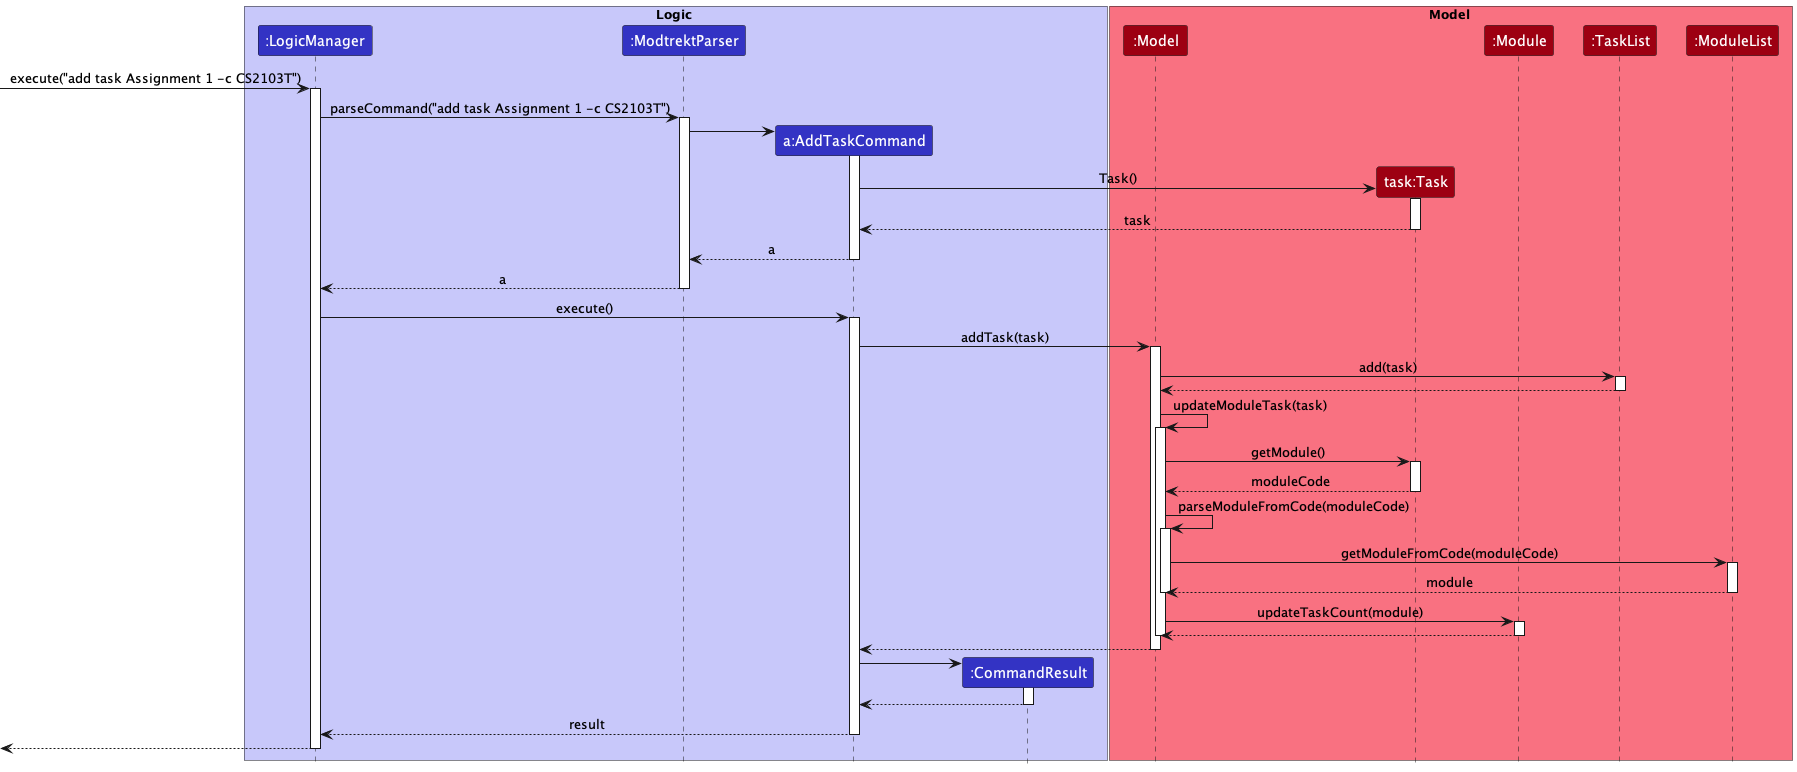
The arguments are first parsed through ModtrektParser to identify the type of Command to be returned, based on the command word
and tags specified. In this case it is AddTaskCommand. After parsing the arguments, a task object is created. A task
objected would be used to instantiated by the created AddTaskCommand. When the AddTaskCommand is executed, the Model would add the task
to the TaskList. After adding the task, the Model invokes its own method to update the task count of the module
whose code is associated with the task.
Remove Task
In this section, the functionality of remove task feature, expected execution path, and the interactions between the
RemoveTaskCommand, ModtRektParser, and other objects will be discussed.
What is the remove task feature
The remove task features allows users to remove a task/deadline that they have taken or mistakenly inputted into
TaskList.
Removal of a Task would result in the reduction of the task count of the Module with the module code the task
is associated with.
The task removed is specified by its index on the displayed list.
Current implementation
The diagram below showcases the path execution for when removing a task
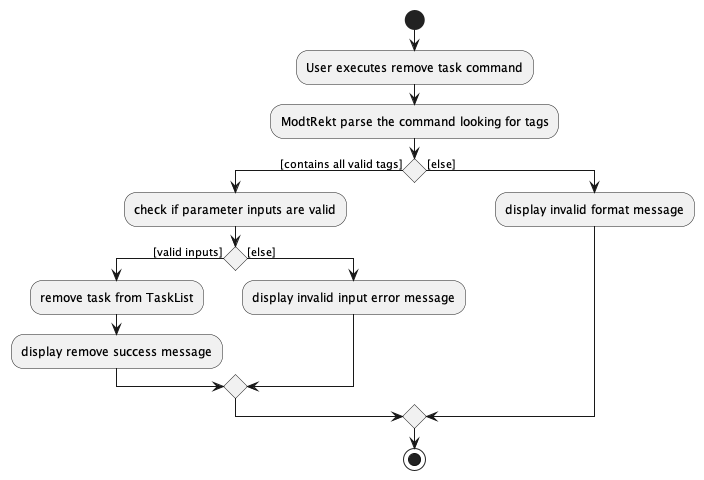
The diagram below shows how the remove command work with input remove task 1
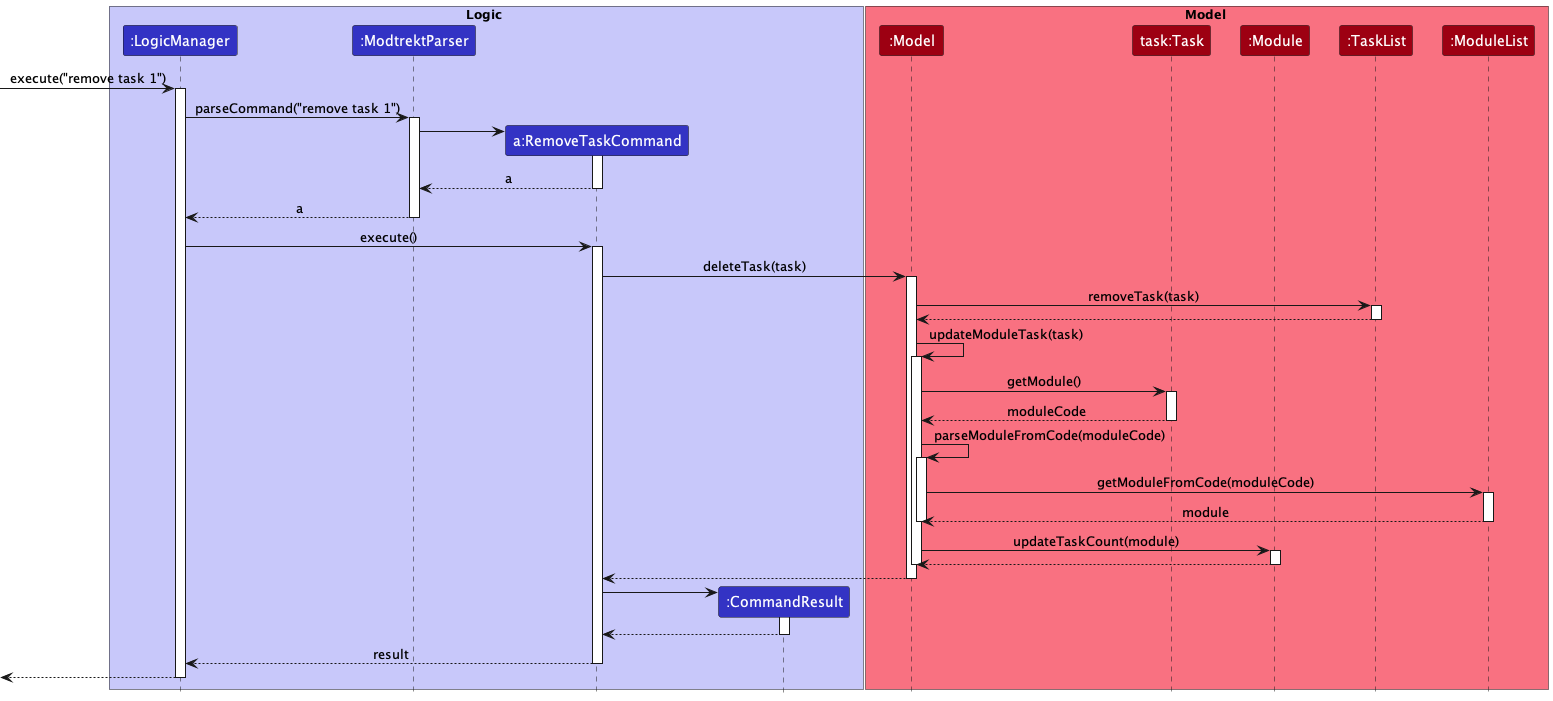
The arguments are first parsed through ModtrektParser to identify the type of Command to be returned, based on the command word
and tags specified. A RemoveTaskCommand would then be instantiated, and the 1 specified in the command would be utilised
as the parameter within the command to locate the task in the stored list. When the RemoveTaskCommand is executed, it would
first obtain the Task using the index. Then it would remove the Task from the TaskList. Using the saved
Task it would then reduce the task count of the Module whose code is equal to that of the removed Task.
Edit Task
In this section, the functionality of edit task feature, expected execution path, and the interactions between the
EditTaskCommand, ModtRektParser, and other objects will be discussed.
What is the edit task feature
The edit task features allows users to edit a task/deadline that they have erroneously added.
This allows them to update details of the task, such as the due date, description and module code.
Editing a task has no effect on the task count of a module, as it is a replacement of an existing task.
Design considerations
Aspect 1: Whether editing tasks should be allowed:
-
Alternative 1 (current choice): Allow editing of tasks.
- Pros: Allows users to change partial details in the event of a small error.
- Cons: Have to parse a varying amount of optional arguments.
-
Alternative 2: No edit command, user would have to delete and re-add their task.
- Pros: Convenient for development, less bug-prone.
- Cons: Inconvenient and troublesome for the user.
We decided to go with the alternative 1 to give our users the best experience possible.
Current implementation
The diagram below showcases the path execution for when edit a task
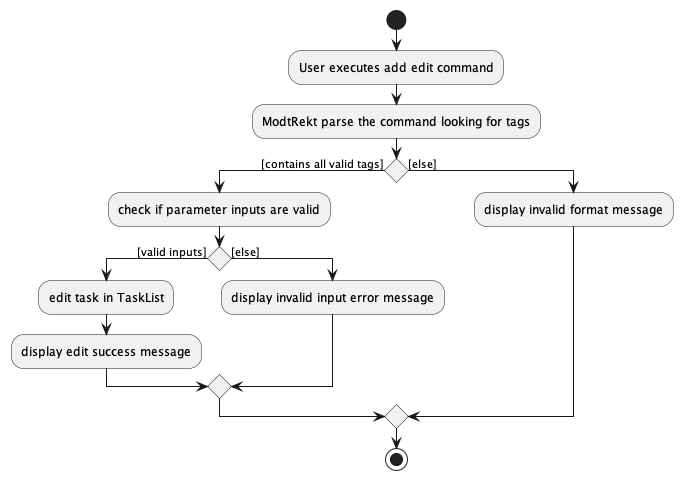
The diagram below shows how the remove command work with input edit task 1 -c CS2103T -ds "Assignment 2"
Note that the sequence diagram has been kept simple, as the logic flow for addTask(t) and
removeTask(t) have been covered in greater detail in the earlier diagrams.
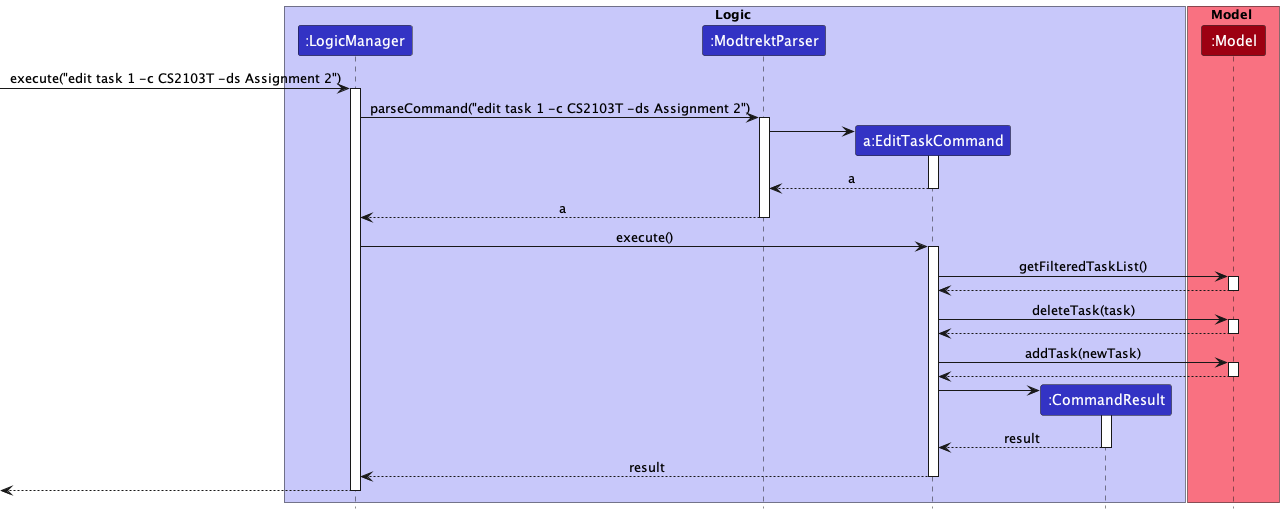
The arguments are first parsed through ModtrektParser to identify the command word. The command word will help
identify the type of Parser needed to parse the rest of the arguments. In this case it is EditTaskCommandParser. After
obtaining the index, it would be used to instantiate a EditTaskCommand. When the EditTaskCommand is executed, it would
first obtain the Task using the index. Then it would remove the Task from the TaskList. It would also create a new Task
with the information specified by the user. The TaskList is subsequently updated and the user can now see the updated
task details in the list.
Marking tasks as done
Section by : Jonathan
Marking tasks as done allows users to selectively hide tasks that they have completed with the list task command
afterward.
Every task in the task book will be in either the done or undone state. New tasks will be created in the undone state.
In this section, we will discuss the management of done/undone state, as well as the interactions between the commands, their parsers, and the UI.
The relevant commands for this section are:
-
done task <task index>marks the task visible in the UI with the specified index as done. -
undone task <task index>marks the task visible in the UI with the specified index as undone.
Design considerations
There was an alternative we considered for users to select the task to mark as done:
-
Alternative 1: Using the task name:
- Pro: Users do not have to search for a task and its index.
- Pro: Users can mark tasks that aren’t visible in the UI as done.
- Con: Users have to type a significant amount to disambiguate tasks by their name.
- Con: Users have to remember the task names which may be difficult if there are many tasks.
-
Alternative 2: Using the task index of the current module (current implementation):
- Pro: Users can mark tasks as done by their index easily without much typing.
- Con: Users now have to use
lsandls -ato view undone tasks or all tasks respectively.
Seeing as we prioritize a CLI, we chose the second option as it would be simpler for users to use.
Current implementation
The done/undone state is handled in the Task class via a boolean flag isDone.
Because Task is immutable, the methods Task::setAsDone and Task::setAsUndone return a new Task
with the done/undone state changed instead of mutating the isDone variable directly.
The following activity diagram shows the execution and control flow of the done command.
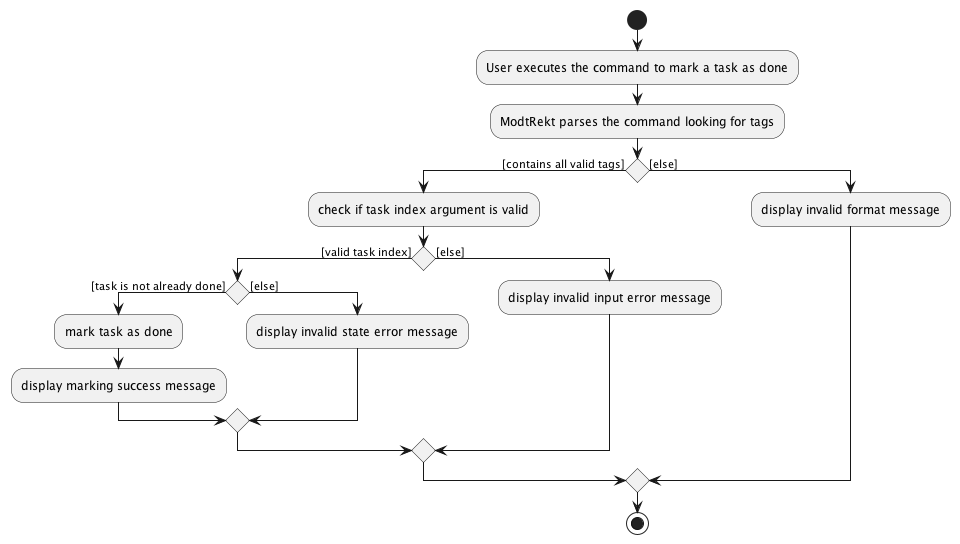
Notice how we explicitly prevent a done task from being marked as done again. Even though marking a done task as done again
is inconsequential from a data perspective (nothing in a Task changes other than the creation of a new instance),
it is still a user error that should be handled:
Suppose that a user intended to mark a task as undone, but accidentally entered the
done taskcommand instead. By displaying an error instead of silently accepting the erroneous command, the user is notified and can enter the correct command next—this results in better UX!
The classes directly involved in setting the done/undone state from user input are:
-
DoneTaskCommandandUndoneTaskCommandwhich are the commands that when executed, mark tasks as done or undone respectively. -
ModtrektParserwhich parses the command word and delegates the parsing to JCommander. -
LogicManagerwhich executes the commands.
For brevity, we omit the diagrams and explanations for marking tasks as undone—it is the direct inverse of marking tasks as done, such that the control flow is exactly the same: just replace “done” and its derivatives with “undone”, and vice versa.
Task listing
Section by : Jonathan
Task listing allows users to view the tasks they have created which belong to a module.
The relevant commands for this section are:
-
cdsets the current module to view tasks for. -
lsdisplays only the undone tasks for the current module in the UI. -
ls -adisplays all the tasks for the current module, including the ones done, in the UI.
Current implementation
We check for the presence of the -a flag to decide whether to display done tasks.
The predicates defined by Model.SHOW_ALL_TASKS and Model.HIDE_DONE_TASKS are used to filter
the tasks displayed in the UI via the updateFilteredTaskList method in the Model interface.
The sequence diagram below details the interactions between the command, parser, and the model
for thels and ls -a commands:
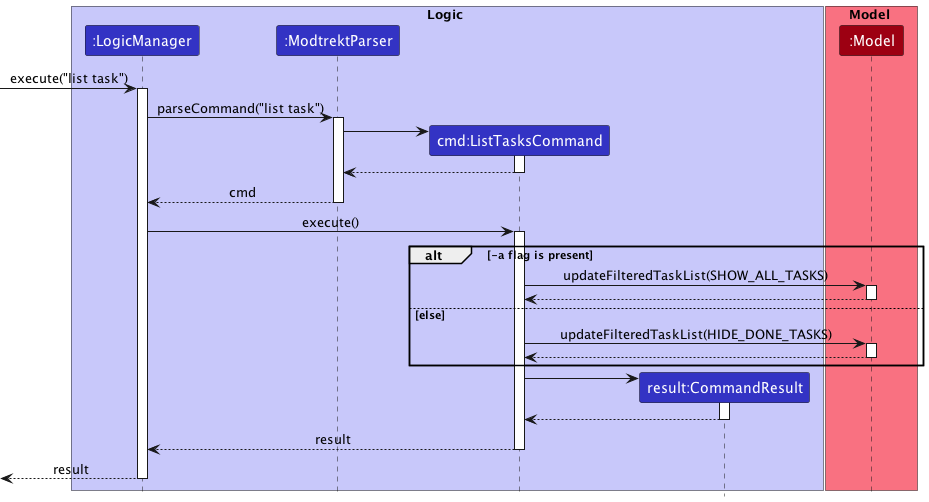
The list command delegates parsing to JCommander, which records the absence or presence of the -a flag as
a boolean areDoneTasksShown.
This boolean variable is used to determine the presence of the -a flag in the sequence diagram above.
Documentation, logging, testing, configuration, dev-ops
Appendix: Requirements
Product scope
Target user profile:
- is an undergraduate studying at NUS
- has a need to track their modules
- has a need to track tasks and deadlines from their modules
- prefers desktop apps over other types
- can type fast
- prefers typing to mouse interactions
- familiar and reasonably comfortable using CLI apps
Value proposition: manage modules and tasks/deadlines for each module faster than a typical GUI driven app
User stories
Priorities: High (must have) - * * *, Medium (nice to have) - * *, Low (unlikely to have) - *
| Category | Priority | As a … | I want to … | So that I can … |
|---|---|---|---|---|
| Onboarding | *** |
first time user learning the app | see the basic commands in the welcome message | start adding modules and tasks immediately |
| Onboarding | *** |
first time user exploring the app | see the app working with sample data | see how the app looks in action |
| UI/UX | ** |
impatient user | utilise commands to quickly be reminded of deadlines | save time locating my deadlines |
| UI/UX | *** |
advanced user | use shortcuts or shorthand commands to add tasks and deadlines | accomplish these tasks in a shorter amount of time |
| UI/UX | *** |
experienced user | quickly add and filter out all my tasks and deadlines using the commands instead of a GUI | these actions are much faster |
| UI/UX | *** |
novice user | use a help command to get a summary of the available commands and how to use them | learn which commands to use |
| UI/UX | *** |
beginner user | see clear and complete error messages when I provide invalid input | correct my mistakes |
| Module Planning | *** |
NUS freshie | add/mark the modules that I plan to take | organize my study plan |
| Module Planning | *** |
user | delete the modules that I added | fix my mistakes if needed |
| Tasks / Deadline | ** |
student overwhelmed by assignments | sort my deadlines | prioritise the ones that are due the soonest |
| Tasks / Deadline | ** |
student overwhelmed by tasks | assign priority ratings to various tasks | prioritise the ones that I deem are more important |
| Tasks / Deadline | ** |
student overwhelmed by tasks | sort tasks via priority ratings | figure out which ones to work on first |
| Tasks / Deadline | *** |
second time user | add a task | so that I can keep track of the things I need to do for a module |
| Tasks / Deadline | *** |
second time user | add a deadline | so that I can keep track of tasks with a due date |
| Tasks / Deadline | *** |
user | choose which modules to add my tasks and deadlines to | organise my tasks and deadlines according to modules |
| Tasks / Deadline | *** |
user | view my tasks and deadlines per module | see my tasks and deadlines in an organised manner |
| Tasks / Deadline | *** |
user | change the module of a specific task or deadline | move my tasks and deadlines around if I make a mistake |
| Tasks / Deadline | *** |
clumsy user | delete tasks and deadlines | ensure my homepage is not cluttered with unused items |
| Tasks / Deadline | ** |
novice user | mark tasks and deadlines that are completed as done | refer to them in future |
| Tasks / Deadline | *** |
novice user | change a deadline that I had created | adjust the due date accordingly in the event the deadline changes |
Use cases
(For all use cases below, the System is the ModtRekt and the Actor is the user, unless specified otherwise)
Use case: View all active tasks and deadlines
MSS
- User requests to view all active tasks and deadlines
-
ModtRekt shows all active tasks and deadlines.
Use case ends.
Extensions
-
2a. The list is empty.
-
2a.1 ModtRekt displays an empty list.
Use case ends
-
Use case: Add a task
MSS
- User requests to add a task and specifies the module for the task
- ModtRekt adds the task
-
Task count of the module is updated, and the task is added to the displayed list
Use case ends.
Extensions
- 2a. The module list is empty
-
2a1. ModtRekt shows an error message when the command is entered
Use case ends.
-
-
3a. The given module code is invalid
-
3a1. ModtRekt shows an error message when the command is entered
Use case resumes at step 1.
-
Use case: Add a deadline
MSS
- User requests to add a deadline and specifies the module for the deadline
- ModtRekt adds the deadline
-
Task count of the module is updated, and the deadline is added to the displayed list
Use case ends.
Extensions
- 2a. The module list is empty
-
2a1. ModtRekt shows an error message when the command is entered
Use case ends.
-
-
3a. The given module code is invalid
-
3a1. ModtRekt shows an error message when the command is entered
Use case resumes at step 1.
-
Use case: Remove a task
MSS
- User requests to remove a task
- ModtRekt shows a list of tasks
- User requests to remove a specific task via index
-
ModtRekt removes the task
Use case ends.
Extensions
-
2a. The task list is empty.
Use case ends.
-
3a. The given index is invalid.
-
3a1. ModtRekt shows an error message.
Use case resumes at step 2.
-
Use case: User marks a task as done
MSS
- User requests to mark a task as done.
-
ModtRekt updates the task to display a
donetag. It also reduces theActive Taskscounter by 1.Use case ends.
Extensions
- 2a. The given index is invalid.
- 2a1. ModtRekt shows an error message when the command is entered.
Use case ends.
- 2a. Task is currently marked as done.
- 2a1. ModtRekt shows an error message when the command is entered to indicate to the user that the task is already marked as done.
Use case ends.
Use case: User marks a task as undone
MSS
- User requests to mark a task as undone.
-
ModtRekt removes the
donetag of the task. It also increases theActive Taskscounter by 1.Use case ends.
Extensions
- 2a. The given index is invalid.
- 2a1. ModtRekt shows an error message when the command is entered.
Use case ends.
- 2a. Task is currently marked as undone.
- 2a1. ModtRekt shows an error message when the command is entered to indicate to the user that the task is already marked as undone.
Use case ends.
Use case: Edit a task
MSS
- User requests to edit a task, and specifies new details such as description, priority or deadline.
-
ModtRekt updates the task information to reflect the new details
Use case ends.
Extensions
- 2a. The given index is invalid.
- 2a1. ModtRekt shows an error message when the command is entered.
Use case ends.
- 2b. Module code does not exist within the displayed list.
- 2a1. ModtRekt shows an error message when the command is entered.
Use case ends.
- 2b. Updated details are invalid, for example date is in an invalid format.
- 2a1. ModtRekt shows an error message when the command is entered.
Use case ends.
Use case: Add a module
MSS
- User requests to add a module, specifying only its module code.
-
ModtRekt adds the module to the displayed list.
Use case ends.
Extensions
- 2a. The module code specified is invalid (i.e. not on NUSMods).
- 2a1. ModtRekt shows an error message, prompting user to utilise the verbose add module command.
Use case ends.
Use case: Add a module with verbose command
MSS
- User requests to add a module, specifying a code, title and credits.
-
ModtRekt adds the module to the displayed list.
Use case ends.
Extensions
- 2a. Credits that the user specifies is greater than 2 digits or is negative.
- 2a1. ModtRekt shows an error message indicating that the credit input is invalid.
Use case ends.
- 2b. Code that the user specifies is not within 6-9 characters, or contains non-alphanumeric characters.
- 2b1. ModtRekt shows an error message indicating that the code input is invalid.
Use case ends.
- 2c. User input contains a syntax error, for example a missing flag or an additional input.
- 2c1. ModtRekt shows an error message indicating that the syntax of the command is invalid, and shows the user the proper command syntax.
Use case ends.
Use case: Remove a module
MSS
- User requests to remove a module, specifying a code.
-
ModtRekt removes the module from the displayed list
Use case ends.
Extensions
- 2a. Module code does not exist within the displayed list
- 2a1. ModtRekt shows an error message when the command is entered.
Use case ends.
Use case: Edit a module
MSS
- User requests to edit a module, specifying a code and editing details such as its credit or name.
-
ModtRekt updates the specified module with new details.
Use case ends.
Extensions
- 2a. Module code does not exist within the displayed list.
-
2a1. ModtRekt shows an error message when the command is entered.
Use case ends.
-
- 2b. Updated details are invalid, for example credit exceeds 2 digits or is negative.
- 2a1. ModtRekt shows an error message when the command is entered, indicating that the credit input is invalid.
Use case: User cd’s into a module
MSS
- User requests to
cdinto a module. -
ModtRekt updates task list to display the tasks under that module, and adds a selected tag to the module on the interface.
Use case ends.
Extensions
- 2a. Module code does not exist within the displayed list.
- 2a1. ModtRekt shows an error message when the command is entered.
Use case ends.
Use case: User cd’s back to the main page
MSS
- User runs the command
cd ... -
ModtRekt updates task list to display all tasks, and removes the selected tag on the module that was
cd-ed out of.Use case ends.
Extensions
- 2a. User is not
cd-ed into a module.- 2a1. ModtRekt shows an error message saying that all tasks are already being displayed.
Use case ends.
Use case: User marks a module as done
MSS
- User requests to mark a module as done.
-
ModtRekt updates module to display a
donetag, and also marks all the tasks under that module asdoneas well. It also updates theMCs Completedcounter to add the credits of the module.Use case ends.
Extensions
- 2a. Module code does not exist within the displayed list.
- 2a1. ModtRekt shows an error message when the command is entered.
Use case ends.
- 2a. Module is currently marked as done.
- 2a1. ModtRekt shows an error message when the command is entered to indicate to the user that the module is already marked as done.
Use case ends.
Use case: User marks a module as undone
MSS
- User requests to mark a module as undone.
-
ModtRekt removes the
donetag of the module. It also reduces theMCs Completedcounter by the number of credits of the module.Use case ends.
Extensions
- 2a. Module code does not exist within the displayed list.
- 2a1. ModtRekt shows an error message when the command is entered.
Use case ends.
- 2a. Module is not currently marked as done.
- 2a1. ModtRekt shows an error message when the command is entered to indicate to the user that the module is already marked as undone.
Use case ends.
Use case: View all active modules
MSS
- User requests to view all active modules.
-
ModtRekt shows all active modules.
Use case ends.
Use case: View all modules, including those marked as done
MSS
- User requests to view all modules, including those marked as done.
-
ModtRekt shows all modules, including those marked as done.
Use case ends.
Non-Functional Requirements
- Should work on any mainstream OS as long as it has Java
11or above installed. - Should be able to hold up to 100 modules without a noticeable sluggishness in performance (i.e. should take less than 1 second to load)
- A user with above 80 wpm typing speed for regular English text (i.e. not code, not system admin commands) should be able to accomplish most of the tasks faster using commands than using the mouse.
- The interface should be user-friendly enough such that a user who has never seen the user guide should be able to use it.
- The product is designed to be used by one user.
- The data should only be stored locally and the text file should be human editable.
- The GUI should work well for standard screen resolutions 1920x1080 and higher and for screen scales 100% and 125%.
- The GUI should be usable for resolutions 1280x720 and higher and for screen scales 150%.
- The product file size should not exceed 100MB.
- The document file size should not exceed 15MB.
- The DG and UG should be PDF-Friendly.
- The data should be saved every time a command alters the data.
Glossary
Mainstream OS
Windows, Linux, Unix, macOS
Appendix: Instructions for manual testing
Given below are instructions to test the app manually.
Launch and shutdown
-
Initial launch
-
Download the jar file and copy into an empty folder
-
Double-click the jar file Expected: Shows the GUI with a set of sample contacts. The window size may not be optimum.
-
-
Saving window preferences
-
Resize the window to an optimum size. Move the window to a different location. Close the window.
-
Re-launch the app by double-clicking the jar file.
Expected: The most recent window size and location is retained.
-
-
Shut down application
-
Prerequisites: Application must currently be running.
-
Test case: Close the application using any means other than the command
exit. Expected: The application exits. -
Test case: Close the application using the command
exit. Expected: The application exits.
-
Adding a module
-
Adding a module while all modules are being shown
- Prerequisites:
- All modules are being shown (i.e. run
list module -afirst). - You are not currently
cd‘d into a module (cd ..if you are). - The module does not already exist in the module list.
- All modules are being shown (i.e. run
-
Test case:
add module CS2103T
Expected: Module CS2103T is being added to the module list. Details of the added module shown in the status message. -
Test case:
add module CS2100 -n "Computer Organisation" -cr 4
Expected: Module CS2100 is being added to the module list. Details of the added module shown in the status message. -
Test case:
CS2103Talready exists and you inputadd module CS2103T
Expected: No module is added. Error stating module already exists appears is displayed. - Test case:
add module CS2100 -n "Computer Organisation"
Expected: No module is added. Error showing command input syntax displayed.
- Prerequisites:
Removing a module
-
Removing a module while all modules are being shown
- Prerequisites:
- All modules are being shown (i.e. run
list module -afirst). - You are not currently
cd‘d into a module (cd ..if you are). - The module exists in the module list.
- All modules are being shown (i.e. run
-
Test case:
remove mod CS2103TwhenCS2103Tdoes not exist in the module list.
Expected: Module CS2103T is being removed from the module list. Tasks associated with the module are also removed from the task book. Details of the deleted task shown in the status message. - Test case:
remove mod CS2100when `CS2100 does not exist in the modules list
Expected: No module is deleted. Error stating that module does not exist is displayed.
- Prerequisites:
Editing a module
-
Removing a module while all modules are being shown
- Prerequisites:
- All modules are being shown (i.e. run
list module -afirst). - You are not currently
cd‘d into a module (cd ..if you are). - The module exists in the module list.
- All modules are being shown (i.e. run
-
Test case:
edit module CS2103T -c CS2100whereCS2103Texists andCS2100does not exist in module list.
Expected: Module with code CS2103T is replaced with CS2100. Message indicating a successful edit is displayed. -
Test case:
edit module MA1521 -n "calculus"whenMA1521does not exist in module list.
Expected: No module is edited. Error stating that module does not exist is displayed. - Test case:
edit module MA1521 -d 2000-12-1whenMA1521exists in module list.
Expected: No module is edited. Error containing proper command syntax is displayed.
- Prerequisites:
Changing the currently selected module
-
Changing the currently selected module using the
cdcommand-
Prerequisites: A module with module code
CS2109Sexists. -
Test case:
cd CS2109S
Expected: The module with codeCS2109Sis shown with theselectedtag in the UI, and only tasks with module codeCS2109Sare shown in the UI. -
Test case:
cd ..
Expected: Theselectedtag is removed from the module with codeCS2109Sin the UI, and the UI now displays tasks belonging to all modules.
-
-
Using the
cd ..command while no current module is set-
Prerequisites: No current module is set, i.e. The user is not currently
cd‘d into any module. -
Test case:
cd ..
Expected: No change to modules/tasks, an error message “Already showing all modules” is displayed to the user.
-
-
Using the
cdcommand with an invalid module code- Test case:
cd morethannine, or any other module code that does not conform to specifications (between 6 and 9 alphanumeric characters)
Expected: The command is unsuccessful, no changes to modules/tasks, and an error message including the module code constraints is displayed to the user.
- Test case:
-
Using the
cdcommand with a valid module code that does not exist-
Prerequisites: There does not exist a module with code
CS1010. -
Test case:
cd CS1010
Expected: The command is unsuccessful, no changes to modules/tasks, and an error message indicating that the module does not exist is displayed to the user.
-
Marking a module as done
-
Marking a module as done while all modules are being shown
- Prerequisites: All modules are shown, and user is not currently cd-ed into a module. cs2101 is added to the module list.
- Test case:
done mod cs2101Expected: Module cs2101 will have a tagdoneadded to it. All tasks related to cs2101 will be marked as done. - Test case:
done mod cs2103tExpected: No module is marked asdoneas cs2103t is not added to the system. Error details shown in the status message.
-
Marking a module as done while cd-ing to a module
- Prerequisites: CD to a specific module.
- Test case:
done mod cs2101Expected: No module is marked asdoneas user is cd-ed to a module. Error details shown in the status message.
Unmarking a module
-
Unmarking a module while all modules are being shown
- Prerequisites: All modules are shown, and user is not currently cd-ed into a module. cs2101 is added to the module list and is marked as
done. - Test case:
undone mod cs2101Expected: Module cs2101’sdonetag is removed. All tasks related to cs2101 will not be affected. - Test case:
undone mod cs2103tExpected: No module’s tag is removed as cs2103t is not added to the system. Error details shown in the status message.
- Prerequisites: All modules are shown, and user is not currently cd-ed into a module. cs2101 is added to the module list and is marked as
-
Unmarking a module while the module is not marked as done
- Prerequisites: All module are shown, and user is not currently cd-ed into a module. cs2101 is added to the module list and is not marked as
done. - Test case:
undone mod cs2101Expected: No module’s tag is removed as cs2101 is not marked as done yet. Error details shown in the status message.
- Prerequisites: All module are shown, and user is not currently cd-ed into a module. cs2101 is added to the module list and is not marked as
-
Unmarking a module as done while cd-ing to a module
- Prerequisites: CD to a specific module.
- Test case:
undone mod cs2101Expected: No module’s tag is removed as user is cd-ed to a module. Error details shown in the status message.
List modules
-
List active modules
- Test case:
list modExpected: All modules that don’t containdonetag will be displayed.
- Test case:
-
List all modules
- Test case:
list mod -aExpected: All modules will be displayed.
- Test case:
Adding a task
-
Adding a task while not cd-ed into a module
-
Prerequisites: User is not currently cd-ed into a module, and only has 1 module added. For the test cases below, this module is assumed to take the code
CS2103T, but this can be changed to any other module code, as long as it is present within the module list. -
Test case:
add task "Submit PPP" -d 2022-11-07 -c CS2103T
Expected: Task is added to the task list. Details of the added task shown in the status message, displayed task count of moduleCS2103Tand active tasks are incremented by one. -
Test case:
add task "Submit PPP"
Expected: No task is added. Error details shown in the status message. Status bar remains the same. -
Test case:
add task -d 2022-11-07 -c CS2103T
Expected: No task is added. Error details shown in the status message. Status bar remains the same. -
Other incorrect remove commands to try:
add t "Submit PPP" -CS2103T,add -t Submit PPP
Expected: Similar to previous.
-
-
Adding a task while cd-ed into a module
-
Prerequisites: User is currently cd-ed into a module. For the test cases below, this module is assumed to take the code
CS2103T, but this can be changed to any other module code, as long as it is present within the module list. -
Test case:
add task "Submit PPP" -d 2022-11-07
Expected: Task is added to the task list. Details of the added task shown in the status message, displayed task count of moduleCS2103Tand active tasks are incremented by one. -
Test case:
add task "Submit PPP"
Expected: Task is added to the task list. Details of the added task shown in the status message, displayed task count of moduleCS2103Tand active tasks are incremented by one. -
Test case:
add task -d 2022-11-07
Expected: No task is added. Error details shown in the status message. Status bar remains the same. -
Other incorrect remove commands to try:
add t "Submit PPP",add -t Submit PPP
Expected: Similar to previous. -
Test case:
add task Assignment -c CS2103T
Expected: Task is added to the task list. Details of the added task shown in the status message, displayed task count of moduleCS2103Tand active tasks are incremented by one.
-
Removing a task
- Removing a task while all tasks are being shown
-
Prerequisites: All tasks (at least one, done and undone) are shown, and user is not currently
cd‘ed into a module. -
Test case:
remove task 1
Expected: First task (as displayed on the UI) is deleted from the list. Details of the deleted task shown in the status message. -
Test case:
remove task 0
Expected: No task is deleted. Error details shown in the status message. Status bar remains the same. -
Test case:
remove task -1
Expected: No task is deleted. Error details shown in the status message. Status bar remains the same. -
Other incorrect remove commands to try:
remove,remove -t x,...(where x is larger than the displayed list size)
Expected: Similar to previous.
-
Editing a task
-
Editing a task while all tasks are being shown
-
Removing a module while all modules are being shown
- Prerequisites:
- All tasks are being shown (i.e. run
list task -afirst). - The task exist in the task book.
- All tasks are being shown (i.e. run
-
Test case:
edit task 1 -d "return book"where1is a valid index.
Expected: The task with index 1 in the current task book is edited to have a new description. Message indicating a successful task edit is displayed. -
Test case:
edit task 1 -p highwhere1is a valid index.
Expected: The task with index 1 in the current task book is edited to have a new priority. Depending on what the other tasks parameters are, the task may change index to showcase the change in priority. Message indicating a successful task edit is displayed. - Test case:
edit task 3 -p lowwhere3is an invalid index.
Expected: No task is edited. Error indicating the valid index range is displayed.
- Prerequisites:
Marking tasks as done (and undone)
-
Marking a task as done:
- Pre-requisites:
- You have at least one undone task (see
add task). - You are not currently
cd‘d into a module (cd ..if you are). - All tasks are being shown (i.e. run
list task -afirst).
- You have at least one undone task (see
- Test case:
done task 1
Expected: The first task (topmost in the UI) is marked as done (with a “done” label) and a success message is displayed. - Test case:
done task 1followed by anotherdone task 1
Expected: An error message saying that the task is already marked as done is displayed. - Test case:
done task 0
Expected: No task is marked as done and an error message is displayed.
- Pre-requisites:
-
Hiding the done tasks:
- Pre-requisites:
- You have just completed the previous test case - there should only be 1 task and it should be done.
- Test case:
list task
Expected: The task is no longer shown in the UI.
- Pre-requisites:
-
Showing the done tasks:
- Pre-requisites:
- You have just completed the previous test case - no tasks should be visible in the UI.
- Test case:
list task -a
Expected: The task is shown in the UI. - Test case:
list task -A
Expected: A syntax error message is displayed, because the flag is case-sensitive.
- Pre-requisites:
-
Unmarking a task that is shown as done:
- Pre-requisites:
- You have just completed the previous test case - there should be at least 1 task and it should be done and visible.
- Test case:
undone task 1(replace1with the top-most undone task number)
Expected: The undone task (topmost among those undone in the UI) is unmarked (the “done” label disappears) and a success message is displayed. - Test case:
undone task 1followed by anotherundone task 1
Expected: An error message saying that the task is already marked as undone is displayed. - Test case:
undone task 0
Expected: No task is unmarked as done and an error message is displayed.
- Pre-requisites:
Saving data
-
Dealing with missing/corrupted data files
-
Test case: Delete all data files (i.e.
modulelist.json,taskbook.json).
Expected: The application will start with an empty module and task list. The application will create a new data file when the user exits the application. -
Test case: Delete a closing bracket in one or more data files (i.e.
modulelist.json,taskbook.json). Expected: The application will start with an empty module and task list. The application will create a new data file when the user exits the application. -
Test case: Modify the date of one the tasks in the
taskbook.jsonfile to be of an invalid format, for example09-09-2022. Expected: Similar to previous -
Test case: Modify the date of one the tasks in the
taskbook.jsonfile, but maintain the same format. Expected: The application boots up normally, with the saved data (if any), and the changes should be reflected on the UI. -
Test case: Modify the module code of one the tasks in the
taskbook.jsonfile to be one that is not in the module list. Expected: The application will start with an empty module and task list. The application will create a new data file when the user exits the application.
-